DIY Face Masks: Recipes for Every Skin Type at Home
DIY face masks offer a natural and affordable way to address various skin concerns, using ingredients readily available in your kitchen to create customized treatments for every skin type.
Discover the world of DIY face masks: recipes for every skin type using ingredients you already have. Creating your own face masks is a fantastic way to pamper your skin naturally and affordably.
Why Choose DIY Face Masks?
DIY face masks are gaining popularity as people seek more control over what they put on their skin. They’re a great way to avoid harsh chemicals and additives found in many commercial products.
But what makes them so appealing? Let’s delve into the benefits of creating your own skincare treatments at home.
Natural Ingredients
One of the biggest advantages of DIY face masks is the use of natural ingredients. You can choose exactly what goes into your mask, ensuring it’s free from synthetic fragrances, parabens, and other potentially harmful chemicals.
- Knowing exactly what you’re putting on your skin.
- Avoiding potential allergens and irritants.
- Harnessing the power of nature for skincare.
Cost-Effectiveness
High-end skincare products can be expensive. DIY face masks provide a budget-friendly alternative, using ingredients that are often already in your pantry or refrigerator. This can save you a significant amount of money while still providing effective skincare.

Plus, you can customize your mask to address your specific skin concerns, ensuring you’re not wasting money on products that don’t deliver the desired results.
Customization
Every skin type is different, and what works for one person may not work for another. DIY face masks allow you to tailor your treatment to your unique skin needs. Whether you have oily, dry, sensitive, or combination skin, you can adjust the ingredients to create the perfect mask for you.
From adjusting the consistency to adding specific ingredients for targeted benefits, the possibilities are endless.
In conclusion, DIY face masks offer a natural, cost-effective, and personalized approach to skincare, allowing you to create treatments that perfectly cater to your skin’s needs.
Understanding Your Skin Type
Before diving into recipes, it’s important to understand your skin type. This will help you choose the best ingredients for your DIY face masks and avoid potential irritation.
Let’s explore the different skin types and their specific needs.
Generally, there are five main skin types: normal, oily, dry, combination, and sensitive. Each requires different ingredients and care.
Normal Skin
Normal skin is well-balanced, with neither excessive oiliness nor dryness. It typically has small pores and a smooth texture. DIY face masks for normal skin should focus on maintaining this balance and providing hydration.
Ingredients like honey, yogurt, and aloe vera are excellent choices for normal skin, offering gentle hydration and nourishment.
Oily Skin
Oily skin produces excess sebum, leading to a shiny appearance and enlarged pores. DIY face masks for oily skin should aim to control oil production, unclog pores, and prevent breakouts.
- Clay masks to absorb excess oil.
- Lemon juice to tighten pores.
- Oatmeal to soothe inflammation.
Dry Skin
Dry skin lacks moisture, leading to flakiness, tightness, and sometimes itchiness. DIY face masks for dry skin should focus on providing deep hydration and restoring the skin’s natural moisture barrier.
Avocado, honey, and olive oil are great ingredients for dry skin, offering intense hydration and nourishment.
Combination Skin
Combination skin has characteristics of both oily and dry skin, with an oily T-zone (forehead, nose, and chin) and dry cheeks. DIY face masks for combination skin should balance oil production in the T-zone while providing hydration to the dry areas.
Ingredients like yogurt, honey, and gentle exfoliants can help balance combination skin, leaving it feeling refreshed and revitalized.
Sensitive Skin
Sensitive skin is easily irritated and prone to redness, itching, and breakouts. DIY face masks for sensitive skin should be gentle, soothing, and free from potential allergens and irritants.
Aloe vera, oatmeal, and chamomile are calming and soothing ingredients that are suitable for sensitive skin. Always do a patch test before applying any new mask to your entire face.
In summary, knowing your skin type is crucial for choosing the right ingredients and creating DIY face masks that will benefit your skin without causing irritation.
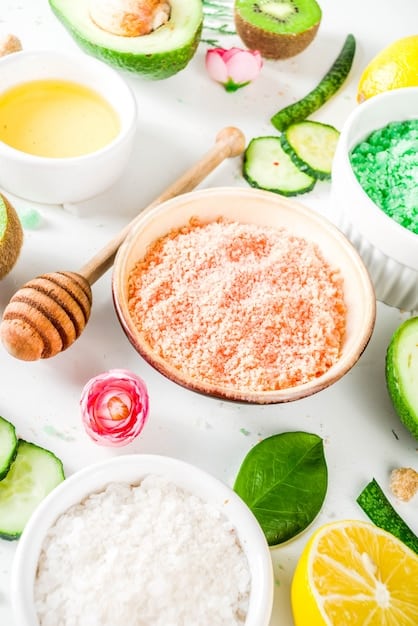
DIY Face Mask Recipes for Oily Skin
Oily skin requires masks that can absorb excess oil, unclog pores, and reduce shine. Here are a few effective recipes using ingredients you likely already have at home.
These recipes are designed to help you achieve a balanced and clear complexion without harsh chemicals.
Clay Mask for Oil Absorption
Clay masks are excellent for absorbing excess oil and impurities from the skin. Bentonite clay and kaolin clay are particularly effective.
Mix 1 tablespoon of clay with 1 tablespoon of water or apple cider vinegar to form a paste. Apply to your face, avoiding the eye area, and leave on for 10-15 minutes. Rinse with warm water and pat dry.
Lemon and Honey Mask for Pore Tightening
Lemon juice is a natural astringent that can help tighten pores and reduce oil production. Honey adds moisture and has antibacterial properties.
- Mix 1 tablespoon of honey with 1 teaspoon of lemon juice.
- Apply to your face and leave on for 10 minutes.
- Rinse with warm water and pat dry.
Oatmeal Mask for Soothing Inflammation
Oatmeal can help soothe inflammation and absorb excess oil. It’s a gentle exfoliant that can help remove dead skin cells and unclog pores.
Combine 2 tablespoons of ground oatmeal with 1 tablespoon of honey and enough water to form a paste. Apply to your face and leave on for 15 minutes. Rinse with warm water and pat dry.
Using these DIY face mask recipes regularly can help control oil production, minimize pores, and achieve a clearer, more balanced complexion.
DIY Face Mask Recipes for Dry Skin
Dry skin needs masks that provide intense hydration and help restore the skin’s natural moisture barrier. Here are a few recipes that will leave your skin feeling soft and supple.
These masks focus on delivering essential nutrients and locking in moisture to combat dryness.
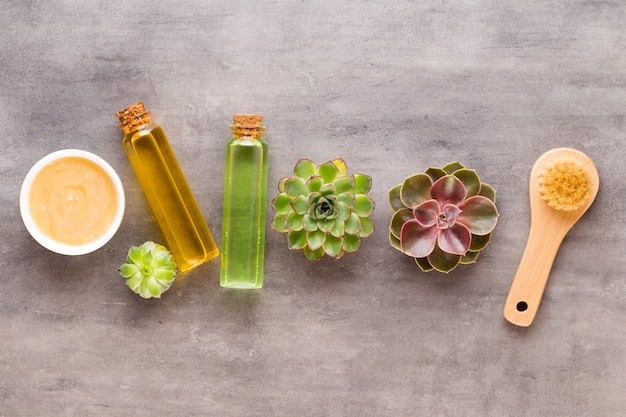
Avocado and Honey Mask for Intense Hydration
Avocado is rich in healthy fats and vitamins that deeply hydrate the skin. Honey is a natural humectant that helps attract and retain moisture.
Mash half an avocado and mix with 1 tablespoon of honey. Apply to your face and leave on for 15 minutes. Rinse with warm water and pat dry.
Olive Oil and Egg Yolk Mask for Nourishment
Olive oil is a rich source of antioxidants and fatty acids that nourish and protect the skin. Egg yolk contains lecithin, which helps hydrate and soften the skin.
- Mix 1 tablespoon of olive oil with 1 egg yolk.
- Apply to your face and leave on for 15 minutes.
- Rinse with warm water and pat dry.
Aloe Vera and Yogurt Mask for Soothing Relief
Aloe vera has soothing and hydrating properties that can help relieve dryness and irritation. Yogurt contains lactic acid, which gently exfoliates and moisturizes the skin.
Combine 2 tablespoons of yogurt with 1 tablespoon of aloe vera gel. Apply to your face and leave on for 15 minutes. Rinse with warm water and pat dry.
Regular use of these DIY face mask recipes can help improve skin hydration, reduce flakiness, and restore a healthy, radiant glow.
DIY Face Mask Recipes for Combination Skin
Combination skin requires masks that balance oil production in the T-zone while providing hydration to drier areas. These recipes aim to achieve that balance for a harmonious complexion.
They’re formulated to address the specific needs of both oily and dry areas simultaneously.
Yogurt and Honey Mask for Balancing
Yogurt helps control oil production in the T-zone while providing gentle hydration to drier areas. Honey adds moisture and has antibacterial properties.
Mix 2 tablespoons of yogurt with 1 tablespoon of honey. Apply to your face and leave on for 15 minutes. Rinse with warm water and pat dry.
Cucumber and Oatmeal Mask for Refreshing
Cucumber has cooling and hydrating properties that can help soothe irritated skin. Oatmeal gently exfoliates and absorbs excess oil.
- Blend half a cucumber with 1 tablespoon of ground oatmeal.
- Apply to your face and leave on for 15 minutes.
- Rinse with warm water and pat dry.
Green Tea and Lemon Mask for Antioxidant Boost
Green tea is rich in antioxidants that protect the skin from damage. Lemon juice tightens pores and reduces oil production in the T-zone.
Steep a green tea bag in hot water for a few minutes, then remove the bag and let the tea cool. Mix 2 tablespoons of green tea with 1 teaspoon of lemon juice. Apply to your face and leave on for 10 minutes. Rinse with cool water and pat dry.
Incorporating these DIY face mask recipes into your routine can help balance oil production, hydrate dry areas, and achieve a more even and radiant complexion.
DIY Face Mask Recipes for Sensitive Skin
Sensitive skin needs masks that are gentle, soothing, and free from potential irritants. These recipes are designed to calm and protect sensitive skin without causing adverse reactions.
They focus on using ingredients known for their soothing and anti-inflammatory properties.
Aloe Vera and Oatmeal Mask for Calming
Aloe vera has soothing and hydrating properties that can help relieve redness and irritation. Oatmeal gently exfoliates and calms inflamed skin.
Combine 2 tablespoons of aloe vera gel with 1 tablespoon of ground oatmeal. Apply to your face and leave on for 15 minutes. Rinse with cool water and pat dry.
Chamomile and Honey Mask for Soothing
Chamomile has anti-inflammatory properties that can help reduce redness and irritation. Honey adds moisture and has antibacterial benefits.
- Steep a chamomile tea bag in hot water for a few minutes, then remove the bag and let the tea cool.
- Mix 2 tablespoons of chamomile tea with 1 tablespoon of honey.
- Apply to your face and leave on for 10 minutes.
- Rinse with cool water and pat dry.
Yogurt and Cucumber Mask for Gentle Hydration
Yogurt is a gentle exfoliant that hydrates and soothes the skin. Cucumber has cooling and hydrating properties that can help reduce inflammation.
Blend half a cucumber with 2 tablespoons of plain yogurt. Apply to your face and leave on for 15 minutes. Rinse with cool water and pat dry.
Using these DIY face mask recipes regularly can help soothe, hydrate, and protect sensitive skin, leaving it feeling calm and comfortable.
| Key Point | Brief Description |
|---|---|
| 🌿 Natural Ingredients | Use ingredients like honey, avocado, and oatmeal to nourish your skin naturally. |
| 💰 Cost-Effective | DIY masks save money compared to expensive store-bought products. |
| ✨ Skin Type Focus | Customize your mask based on whether you have oily, dry, combination, or sensitive skin. |
| 🧪 Patch Test | Always test a small area of skin before applying a new mask to your entire face. |
FAQ
▼
For most skin types, using a DIY face mask once or twice a week is ideal. Overusing masks, especially those with strong ingredients, can lead to irritation or dryness.
▼
Yes, but choose ingredients carefully. Masks with honey, oatmeal, or tea tree oil can be beneficial for acne-prone skin due to their anti-inflammatory and antibacterial properties.
▼
Generally, leaving a DIY face mask on for 10-15 minutes is sufficient. Avoid leaving masks on for too long, as this can dry out or irritate the skin.
▼
Yes, always start with a clean face. Washing your face removes dirt, oil, and makeup, allowing the mask to penetrate the skin more effectively and deliver its benefits.
▼
Store leftover mixtures in an airtight container in the refrigerator. Most DIY face mask mixtures can be stored for up to 2-3 days. Discard if you notice any changes in color or smell.
Conclusion
Creating DIY face masks: recipes for every skin type using ingredients you already have is a simple, cost-effective, and customizable way to enhance your skincare routine. By understanding your skin type and choosing the right ingredients, you can create masks that nourish, hydrate, and protect your skin, leaving it feeling healthy and radiant.


